Howto: Set up a jekyll-based gh-pages site

I’m part of the team developing WebVirt, a web-based graphical libvirt aggregator. We decided to take advantage of Github’s Pages support of a popular Ruby based website generator called Jekyll. Here is (roughly) how the process went:

Step 1: Create your directory structure

Jekyll, when called, will crawl the directory structure you specify, and generate a web site based on it. By creating subfolders that correspond with “categories” of articles, a clearer picture begins to emerge:

.
├── _layouts
├── _includes
|
├── js
├── css
|
├── architecture
│   └── _posts
│       
├── install
│   └── _posts
|
├── reference
│   ├── managerapi
│   │   └── _posts
│   ├── managerconfig
│   │   └── _posts
│   ├── nodeapi
│   │   └── _posts
│   └── nodeconfig
│       └── _posts
├── requirements
│   └── _posts
└── userguide
    └── _posts

All of the categories I intend to generate data about have a subfolder called _posts that will store the copy (think print-copy) that I will be displaying. The _layouts folder on line 2 holds repeated page structures, while _includes holds code snippets for reuse.

Step 2: Set up YAML metadata

Using the Liquid Templating System, an HTML shell can be created as a layout, using special Liquid syntax to indicate where content goes:

<!DOCTYPE html>
<html>
  <head>
    <title>WebVirt Documentation - {{page.title}}</title>
  </head>
  <body data-spy="scroll"  data-offset="25" data-target=".sidebar-nav">
    <div id="virshmanagerapp">
      <div id="main" class="container">
        <div class="row">

            {{ content }}

          <!-- Footer -->
          <footer>
            <div class="row-fluid">
              <div class="span12">
                <footer>
                  <hr>
                  <p class="muted">Designed and Maintained by <abbr title="Centre for the Development of Open Technology @ Seneca College">CDOT</abbr> | Built on {Bootstrap.js Jekyll}</p>
                </footer>
              </div>
            </div>
          </footer>
          <script src="/js/plugins/jquery-1.9.1.min.js"></script>
          <script src="/js/plugins/underscore.js"></script>
          <script src="/js/plugins/toastr.min.js"></script>
          <script src="/js/plugins/bootstrap.min.js"></script>
        </div>
      </div>
    </div>
  </body>
</html>

In addition to a _posts folder, each content category contains an “index.html” file that is loaded when the directory is accessed. This index.html folder uses YAML metadata to indicate a few things to Jekyll – mainly which template to use:

---
layout: default
title: Node API
---

{% include topnav.html %}

<!-- HTML HERE -->

Line 2 indicates that all content below line 4 (‘—‘) will replace Line 10 in the last example ( {{ content }} ). Line 6 is an example of using an html snippet, and makes maintaining common code laughably easy!

Step 3: Set up posts

In order to generate the data properly, the markdown files must be saved with a specific filename format:

XXXX-XX-XX-THIS-IS-THE-TITLE.markdown

Where XXXX is the year, followed by the month then the day. After creating these files in the appropriate _posts folder, we can add metadata for the Liquid Templating system in our HTML files:

---
title: example1
---

## Markdown goes here

Step 4: Use Liquid to display content

On the index.html pages for each category, we can use Liquid’s tag syntax to do basic operations on template variables that jekyll uses to store data programatically:

---
layout: default
title: Node API
---
<div class="row">
  <div class="span2">
    <!-- Navigation -->
    <div class="well sidebar-nav affix">
      <ul class="nav nav-list"> 
        {% for post in site.categories.nodeapi %}
          <li><a href="#{{ post.title }}">{{ post.title }}</a></li>
        {% endfor %}
      </ul>
    </div>
  </div>
  <div class="span10">
    <div id="heading"></div>
    <div class="row">
      <div data-offset="25" class="span10">
	{% for post in site.categories.nodeapi %}
	  <article class="well post" id="{{ post.title }}">
	    {{ post.content }}
	  </article>
	{% endfor %}
      </div>
    </div>
    <div id="pagination" class="pagination pagination-right"></div>
  </div>

By iterating through each post, we can display information in a variety of ways. It becomes very simple to create an API reference. For example, we are using this markdown template:

---
title: example1
---

## API Call `call\format` ##

### Purpose ###

### Usage ###

### Return ###

### Snippets ###

All we have to do is fill in the information, save the files with the appropriate name in the appropriate place and the site will generate itself!

Brilliant. Next post will be an accounting of some common bugs I ran into!

Rubygems on Windows: Dev environment & jekyll installation

Here is a brief outline of how to install Rubygems, the Ruby Devkit and the gem called “Jekyll” on a Windows 7 machine.

Rubygems

The installer file for the Windows Rubyinstaller can be found here. There are a few different versions, and I went with the 64-bit Ruby 2.0.0 installer.

For development, Ruby needs access to native Linux utilities like make and g++. The Rubyinstaller team created a gem that includes these utilities, along with instructions on how to install it all. Ensure that the Devkit you download matches the Rubyinstaller you downloaded earlier, and then do an important check:

Cygwin

If you installed the Cygwin API/Linux-esque utilities, they will have to be uninstalled completely in order for the Devkit to work. Concise instructions can be found here.

Setup

Run the Rubyinstaller executable you downloaded, and follow the prompts to install the softare. Then, extract the Devkit to a directory.

Warning: Ensure that the path to the extracted Devkit folder contains NO SPACES in any of the folder names. You were warned!

At this point, setting up the Devkit is two commands:

> cd DEVKIT_PATH
> ruby dk.rb init
> ruby dk.rb install

This binds the Devkit to all gems in the (new) config.yml file that is found in the extracted directory. Devkit will be injected during the installation of new gems to the directories specified in the config.yml file.

Jekyll

Installing jekyll is as easy as:

> gem install jekyll

After which you can start a jekyll server by using the jekyll command in a directory tree set up for that purpose.

Tutorial: Readme Construction Part 1

I’m designing the readme for our Webvirsh app, and I thought I would document the process of me… documenting stuff. I can’t say I’ve done this before, but there is a certain method to my madness.

Step 1: Define the purpose of the document, then split into logical divisions

By identifying the defining need that caused us to require a document like this, we can then define what function it serves. In this case it’s very simple: software solutions to real world problems are complex, often requiring specialized knowledge to properly set-up and operate.

A good manual that provides detailed information on all aspects of our software could allow someone to become an expert on the software in a short space of time. Ideally, it would also serve as a reference, meaning that someone looking for a specific piece of information could easily find it.

Our software has five logical sections to it: Installation requirements, installation instructions, software functionality, software architecture and supporting technologies (like APIs). Therefore, our readme’s purpose is to clearly define:

  • The prerequisites for the software’s optimal operation
  • The installation & configuration processes
  • The functionality of the app itself
  • The architecture powering it
  • The API’s created to support its operation

Step 2: Investigate each division, taking note of information necessary to document it properly

Software prerequisites

Our software has three kinds of requirements:

  1. Software
  2. Hardware
  3. Network

Software

  1. Supported OS + OS Versions
  2. Critical dependancies

Hardware

  1. CPU/Memory/Storage Requirements
  2. Number of physical nodes required

Network

  1. All nodes must have a direct route to the manager and back

Installation & Configuration

Installation Procedure

The procedure may be slightly different for the node installation and the manager installation. Basic details required:

  • What information must the user collect before installation starts? (e.g. subnet ranges, etc)
  • How to get the software + prerequisites (e.g. git, ssl headers)
  • How to configure the installation (setting any pre-install configuration)
  • How to install the server of choice (node vs manager)
  • How to quickly identify installation problems (troubleshooting)

Configuration

A full reference of all configuration details would be very useful. Basic info required:

  • Which configuration files exist, and what they configure
  • What each setting in the files do, and what they’re options are
  • Common issues that could be encountered (troubleshooting)

App Functionality

Key details:

  • What features does it have?
  • How does the user use each feature?
  • Site-map/use-case chart

Architecture

Key details:

  • What is the network flow of each major function?
  • What ports, layers and technologies underlie each function?
  • What software architecture was the application built on?
  • What system & NPM packages are used?

APIs

  • How many different APIs are being used?
  • What does each call look like? What do they return?
  • How is each call transported?

Step 3: Build an outline of the entire document

Because we know what information we need to document each section, we also know what information is going to be displayed in them! At this point, it should be possible to construct an approximation of the structure of the final document.

Overview                 - h1

Table of Contents        - h1
...

Section 1: Prerequisites - h1
 Hardware                 - h2
  ...
 Software                 - h2
  ...
 Network                  - h2
  ...

Section 2: Installation
      & Configuration    - h1
 Common Configuration     - h2
  ...

 Node Setup               - h2
  Node Configuration       - h3
   ...
  Node Installation        - h3
   ...

 Manager Setup            - h2
  Manager Configuration    - h3
   ...
  Manager Intallation      - h3
   ...

Section 3: Functionality - h1

 Feature 1: Node 
            Management    - h2
  Adding hosts (auto)      - h3
   ...
  Adding hosts (manual)    - h3
   ...
  Common Issues            - h3
   ...

 Feature 2: Dashboard     - h2
  Host information         - h3
   ...
  Viewing Instances        - h3
   ...
  Instance Actions         - h3
   ...

 Feature 3: Server Logs   - h2
  Filtering Logs           - h3
   ...
  Common Issues            - h3
   ...

Section 4: Architecture  - h1

 Server-side Technology   - h2
  Overview                 - h3
   ...
  Node                     - h3
   ...
  Redis                    - h3
   ...

 Client-side Technology   - h2
  Overview                 - h3
   ...
  Backbone.js              - h3
   ...
  Bootstrap.js             - h3
   ...
  Toastr.js                - h3
   ...

 Server-side Architecture - h2
  Node                     - h3
   ...
  Manager                  - h3
   ...

 Client-side Architecture - h2
  Backbone                 - h3
   ...
  Bootstrap                - h3
   ...

 Network Architecture     - h2
  Routing                  - h3
   ...
  Ports                    - h3
   ...
  NMAP                     - h3
   ...

Section 5: Reference     - h1

 Node API                 - h2
  ...

 Manager API              - h2
  ...

 Node Configuration       - h2
  ...

 Manager Configuration    - h2
  ...


Section 6:
        Troubleshooting  - h1
 Installation              -h2
  Node                      -h3
   ...
  Manager                   -h3
   ...
  General                   -h3
   ...

 Configuration             -h2
  Node                      -h3
   ...
  Manager                   -h3
   ...
  General                   -h3
   ...

 Networking                -h2
  Node                      -h3
   ...
  Manager                   -h3
   ...
  General                   -h3
   ...

Section 7: Appendices    - h1
  ...

Conclusion

The goal of the project was to provide a set of APIs that would allow a cloud administrator to remotely access aggregated data about virtual machines running on their hardware, as well as send commands directly to those virtual machines. Our software’s usefulness could vary, depending on who’s looking at it, but the simplicity of its operation was a design goal from the beginning. This means that only a small amount of explanation is needed to understand how to use it, so the focus must be on providing a useful resource.

So far, I’ve determined how this readme is going to be used, what information it needs to be useful, and a basic structure for presenting that information in a clear and useful way. The next step is, of course, collecting the information. Then, it’s down to the iterative process of writing the readme copy and refining it. This will be detailed in a second blog post later this week.

Node.js real time logging with Winston, Redis and Socket.io, p2

Following up on my last blog post Node.js real time logging with Winston, Redis and Socket.io, p1 I want to get into the integration of winston with Socekt.io to stream logs real time to a browser.

So just a quick recap, the idea here is to have a mechanism that logs messages categorized by different levels in the server and displays them at the same time in the browser, keeping the user informed at all times of the action in the back end, or helping a developer spot some bugs without the need to keep an eye on the terminal console or searching for log files buried in the server.

Socket.io

So first we need to initialize the socket.io lib.
This part could be done several different ways, I haven’t found a baseline to follow when initializing and sharing a socket.io handler on express, so if anybody knows please hit me up in the comments.
Anyway, the approach I decided to take was:

  1. Initialize the logger
  2. Register an event listener on the logger instance.
  3. Start the express http server
  4. Start the socket.io server
  5. Fire event on the logger instance
// Create logger
var di = {};
di.config = require('./config/config.js');
var logger = require('./utils/logger.js').inject(di);

// Start listening for socket event on the logger
logger.on("socket", function () {
  this.socketIO = loggerSocket;
});

// Create && Start http server
var server = http.createServer(app);
server.listen(app.get('port'), function() {
  console.log("Express server listening on port " + app.get('port'));
});

// Create socket.io connection
var io = require('socket.io')
console.log("creating socket connection");
var loggerSocket = io.listen(server, {log: false}).of('/logger');

loggerSocket.on('connection', function(socket){
  socket.join(socket.handshake.sessionID);
  // Emit event to logger
  logger.emit("socket");
});

As you can see in the code snippet above, all the dependencies for the logger are saved in an object and injected on the module, in the case it only depends on config.js.
And since the logger is a singleton, all other modules that require the logger will get an already initialized instance.

After we get a handle on the logger, we start listening for the ‘socket’ event, the name could be anything since we are firing the event later in the code. The reason behind this event is that we can to grab a hold of the socket connection and save it inside the logger so we can start streaming logs once they are generated.
We could simply set the reference to socketIO on the logger inside the connection event for the socket, however, by decoupling the socket connection with the logger socket.io handler initialization gives us the flexibility to move things around to different places.

Last, we start the http and socket.io server and fire a socket event whenever the socket.io finishes connecting.

Streaming logs with winston

Now that the logger has a handle of the socket.io connection it can start streaming logs to the browser in real time.

var CustomLogger = function (config) {

  ....
  ....

  winston.stream({ start: -1 }).on('log', function(log) {
    var type = log.transport[0];
    if (self.socketIO && type === "redis") {
      console.log("\n**emitting socket msg");
      self.socketIO.emit("newLog", log);
    }
  });
}

In the logger constructor we initialize the winston stream which listens for all new logs added to different Transports.
That’s why we check for the redis Transports specifically before emitting the log  with socket.io, since we don’t want to emit repeated logs.

Displaying logs on the client

Looking at the client side code

    // Create socketIO connection
    this.logger = io.connect('/logger');
    // Incoming log via socket connection
    this.logger.on('newLog', function (data) {
      var log = new app.Log({
        'timestamp' : data.timestamp,
        'file'      : data.file,
        'line'      : data.line,
        'message'   : data.message,
        'level'     : data.level,
        'id'        : data.id,
      });
      self.socketLog = true;
      self.collections[data.level].add(log);
    });

We create a socket connection with the server and start listening for the ‘newLog’ event, which contains the log data being streamed from winston.
For our app, since we are using Backbone, we create a new Log model and add that Log to the Logger collection, which contains a bunch of Logs.

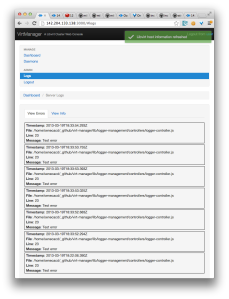
Just to give an idea of how the Logger prototype is shaping up:
Screen Shot 2013-03-19 at 2.38.14 PM

In the end this works, but it could be better.
My idea is to deeply integrate a socket.io streaming functionality with winston, providing the option to start streaming logs straight out of the box. The goal is to make logs as useful as possible, and not just something that’s there but never used.

Node.js real time logging with Winston, Redis and Socket.io, p1

After I had the chance to hack some bugs on Firefox I noticed that they had a very strong logging system built in the project which made the act of logging stuff very easy and standardize.

A few built in logging macros that is very common to see across Firefox code are:

  • NS_ASSERTION
  • NS_WARNING
  • NS_ERROR

The complete list of macros can be found here

Keeping that in mind I thought it would be beneficial to implement something similar in the WebVirt project.
It not only helps developers to spot bugs and keep track of old issues that were appearing in the application, but it also helps users to have a direct access to the server logs, without the need to dig deep through several directories to find one text file with thousands of logs which makes very difficult to get any useful information out of it.

So the basic idea was to have different levels of logs, to make them more granular and provide a simple interface to allow users and developers to use the logs as a debugging tool.

Winston Logging Library

If you are working with Node.js there is a very solid library that is well maintained and used across several projects, the library being winston.

The beauty of winston it is the flexibility and the power it provides.
A quick overview on winston:

Transports
You can create different “Transports”, which are the final location where your logs are stored.
So it is possible to log everything to a database, the console and to a file at the same time.

Metadata
There is support for metadata on a per log basis. Which can be very useful to add extra information about an error that you might be logging.

Querying Logs
Another functionality that is built in the library is the querying of existing logs.
Independently of the Transport you might be using to save your logs, winston can query all the logs and provide them to you in json format with all the metadata tags parsed.

Streaming Logs
This is a very handy feature if you are planning to implement a real time logging solution with web sockets for example.

After looking at all the features winston provided it was a no brainier to start leveraging its power instead of writing a new one from scratch.

So now lets get into the details of how winston is working on WebVirt.

WebVirt Custom Logger

First of all we created a CustomLogger module which wraped winston giving us the flexibility to play around with the CustomLogger implementation without breaking the whole system since we can keep the logger API constant through out the app.

var _logger;

var CustomLogger = function (config) {
}

CustomLogger.prototype = new events.EventEmitter();

CustomLogger.prototype.info = function (msg, metadata) {
};

CustomLogger.prototype.warn = function (msg, metadata) {
};

CustomLogger.prototype.error = function (msg, metadata) {
};

CustomLogger.prototype.query = function (options, cb) {
}

module.exports.inject = function (di) {
  if (!_logger) {
    _logger = new CustomLogger(di.config.logger);
  }
  return _logger;
}

The CustomLogger implements a Singleton pattern which only instantiate one object for the whole app.
We allow a set of custom dependencies to be injected on the module which gives us even more flexibility to move things around without the risk of coupling them together.
We are also extending the EventEmitter functionality to give the options for the CustomLogger to emit its own events to whoever chooses to listen, that could be one option to implementing a real time web socket logging system but later on I’ll show that there is an easier way.
Finally, we just defined all methods we want to make publicly available on the logger.

After creating the skeleton for our CustomLogger we started to integrate winston in it.

var CustomLogger = function (config) {
  require('../external/winston-redis/lib/winston-redis.js').Redis;

  winston.handleExceptions(new winston.transports.Redis());
  winston.exitOnError = false;

  winston.remove(winston.transports.Console);
  winston.add(winston.transports.Console, {
      handleExceptions: true,
      json: true
  });
}

CustomLogger.prototype.info = function (msg, metadata) {
  winston.info(msg, metadata);
};

CustomLogger.prototype.warn = function (msg, metadata) {
  winston.warn(msg, metadata);
};

CustomLogger.prototype.error = function (msg, metadata) {
  winston.error(msg, metadata);
};

As you can see it’s very straight forward, the CustomLogger info, warn and error methods make a direct call to winston.
To initialize winston we require the winston-redis lib, which exposes the Redis Transport for Winston.
This leads me to the next topic:

Winston Redis Transport

Since we are already using Redis to store user information as well host details we chose to use Redis to store the logs too.
The winston-redis module is very easy to use and works out of the box, however, it didn’t fit the exact idea I had about the logging system of WebVirt.

We wanted to display different levels of logs to the user directly in the browser, however, we would need to have some sort of pagination control since the number of logs could go up to the thousands depending on the usage.
Not only that, we would also want to be able to search all logs of a particular level and also have a real time feature built in to display the logs with a websocket on the browser and even set some triggers to send some emails or any sort of notification based on pre-set filters.

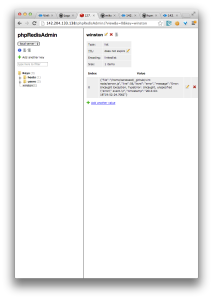
With that being said, winston-redis saves all logs, independently of their level, to a single list on redis:

Screen Shot 2013-03-18 at 4.15.02 PM

So the ability to search and paginate the logs based on their level would be lost since they are all living in the same list.

To fix this issue and save logs on separate lists based on their levels we forked the lib and added an option to set a namespace for the redis container:

Redis.prototype.log = function (level, msg, meta, callback) {
  var self = this,
      container = this.container(meta),
      channel = this.channel && this.channel(meta);

  // Separate logs based on their levels
  container += ":" + level;
  this.redis.llen(container, function (err, len) {
    if (err) {
      if (callback) callback(err, false);
      return self.emit('error', err);
    }
    // Assigns an unique ID to each log
    meta.id = len + 1
    var output = common.log({
      level: level,
      message: msg,
      meta: meta,
      timestamp: self.timestamp,
      json: self.json,
    });

    // RPUSH may be better for poll-streaming.
    self.redis.lpush(container, output, function (err) {
      console.log("lpush callback");
      console.log("err: ", err);
      if (err) {
        if (callback) callback(err, false);
        return self.emit('error', err);
      }

      self.redis.ltrim(container, 0, self.length, function () {
        if (err) {
          if (callback) callback(err, false);
          return self.emit('error', err);
        }

        if (channel) {
          self.redis.publish(channel, output);
        }

        // TODO: emit 'logged' correctly,
        // keep track of pending logs.
        self.emit('logged');

        if (callback) callback(null, true);
      });
    });
  });
};

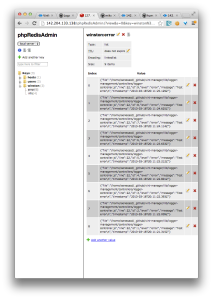
The only difference is that instead of logging everything to to a single “container” we append the level of the log to the “container”, thus splitting the logs into different lists:

Screen Shot 2013-03-18 at 4.15.36 PM

Now when we need to retrieve the logs we can specify how many and on which list we want to perform the query:

CustomLogger.prototype.query = function (options, cb) {
  var start = options.start || 1
    , rows = options.rows || 50
    , type = options.type || 'redis'
    , level = options.level || 'error';

  winston.query({
    'start': +start,
    'rows': +rows,
    'level': level
  }, function (err, data) {
    cb(err, data.redis);
  })
}

Something to keep in mind is that winston.query searches all Transports you have registered.
So if you are logging to multiple transports make sure you only use one Transport when reading the data back or you’ll get repeated values.

This sums it up the first part of the post.
Next I’ll post about how to integrate Socket.IO with Winston and stream logs real time to a browser.

WebVirsh: Migrating Virtual Machines using Libvirt

(See end of post for sources)

Libvirt, and some hypervisors, have the ability to migrate virtual machines from one host to another. I find this extremely impressive, so I’d like to go over the basic concepts of this process. Finally, I will conclude with a description of Libvirt’s migration capabilities in some detail.

Migration

Migration is a three-step process.

FIRST, the virtual machine is suspended, at which point the state of all of its running applications and processes is saved to a file. These files can be referred to as snapshots, since they store information about a VM’s activities at a particular point in time.

SECOND, the snapshot is transferred to the destination host, along with the VM details (usually in the form of an XML file). These details provide information necessary to properly emulate the VM, like the kind of hardware being emulated.

THIRD, the virtual machine is resumed on the destination machine, which constructs an emulation of the hardware from VM details and loads the snapshot into memory. At this point, all network connections will be updated to reflect the new MAC address associated with the VM’s virtual network interfaces and their associated IPs.

Live Migration

Live migration is the holy grain of virtualization technology, and solves the problem of High Availability in many cases. When live migration is possible, it means that an administrator can change which physical machine is hosting a VM, without interrupting the VM’s operations for more than 60-100 milliseconds. Quite a feat! And very useful for balancing load and energy costs without affecting whatever service the VM was providing.

The steps are similar to static migration, but involve some serious trickery when migrating four key components:

  1. CPU state: Required for process migration, so as not to interrupt/corrupt execution.
  2. Storage content: Required for persistent storage access.
  3. Network connections: Required for network activity migration, so as not to interrupt the transport layer of the VM’s network stack.
  4. Memory content: Required for RAM migration. The trickiest part of them all, because the VM is likely to continue to modify its memory even as the migration is occurring.

CPU

As fascinated as I am by the idea, this is too complex a topic to research and explain here.

Storage

Because transferring a virtual hard disk can be time consuming (50-120 seconds, possibly more), cloud providers have side-stepped the problem by having all hosts use a shared storage pool mounted on each host in an identical manner. This way, the transfer can be skipped completely and all machines connected to the pool become (from a storage standpoint) potential hosts.

Network

If the source and destination nodes are on the same subnet, it is as easy as updating the MAC address of the IP associated with the VM’s virtual interface and sending an ARP broadcast to ensure all other machines on the network are aware of the change. If the machines are on separate subnets, there is no way to accomplish this without severely degrading performance.

RAM

For a live migration, the entirety of the VM’s memory (in the form of multiple memory ‘pages’) is copied to the destination host. Memory pages will be repeatedly copied as the VM makes changes to pages on the source host. When the rate of the copying matches the rate of the dirtying, leaving a small number of dirty pages left to be copied, the VM is suspended on the source host. Immediately after suspension, the final “dirty” pages are copied to the destination and the VM is resumed on the new machine. The time between suspension on the source machine, and resumption on the destination machine is trivial with this method – from a few milliseconds to a second or two depending on the size of the paging files. Though the entire process may take longer, the downtime is measured in between these two specific events.

Libvirt Migration

In the same way that Libvirt provides a standard method of sending commands to VMs hosted on a range of hypervisors, there is a standard Libvirt command for migrating a VM from one host to another:

# The most basic form
$> virsh migrate (flags) instanceName destinationURI

In this case, the machine running the command is considered the client, the machine hosting the VM is considered the source and the machine being migrated into is considered the target. In this command, because only the destination URI is specified, Libvirt assumes the client is also the source.

Prerequisites

Migration, live or otherwise, has basic requirements for the source and target machines. Without meeting these, migration will simply fail. Broadly speaking, both machines must have hardware supporting the VM’s emulated environment. Usually this means a similar CPU and a compatible motherboard. The other major requirement is identical storage & networking setups on both machines. On the storage side, the path of the VM’s image on both hosts must be the same. On the network side, all bridged connections to hardware interfaces must be named identically. Ideally, both machines should have identical components, but the networking, storage and basic hardware should be the same.

Options

In order to ensure security, Libvirt can use its daemons on each host to tunnel the transfer of all data during the migration. This is not the default method of migration. A tunnelled connection also requires an explicit peer-to-peer declaration – that is, a tunneled connection must also have the P2P flag enabled, making the command look like this:

# P2P, Tunneling enabled
$> virsh migrate --p2p --tunneled instanceName destinationURI

Conclusion

All in all, this is one impressive piece of technology. Libvirt makes the process quite easy, adding options for letting the Hypervisor manage the process instead of Libvirt, as well as more. See the man page (linked below) for details.

Sources:
Pradeep Padala’s Blog
Virsh MAN Page

VNM Web App with Backbone.js Continued: Changing tactics

In my last post, I talked about the options we had when developing our app with Backbone.js. Because we wanted to avoid persistent storage and learning unnecessary new libraries, we opted to store information about virtual machines (or instances) running on a host in that host’s Host model object.

The hope was to do less work for the same result, but the further we developed the app, the more apparent it became that this approach was inefficient. One of the strengths of Backbone.js is to automatically update the View (and therefore, the DOM) attached to any Model that has changed. Unfortunately, because we didn’t have Models for the instances we wanted to display information about, accessing their information from a Host model, or reacting to changes, required extra code.

As an example, lets assume we had used the two-model architecture we were considering: if an Instance model were to change, only one line of code is required in the appropriate View to ensure that it updates itself automatically.

var InstanceView = Backbone.View.extend({
  initialize: function() {
    ...
    // Instructs the view to re-render the view each time
    // a change event is fired on the model.
    this.listenTo(this.model, "change", this.render); 
  },

  ...  
 
});

// Step 1: Create an instance model object
var instance = new InstanceModel(dataGoesHere);

// Step 2: Create an InstanceView by passing the new
// model object
var exampleView = new InstanceView(instance);

// Step 3: Update a value in the instance model, 
// firing a change event on it and 
// automatically updating the view.
instance.set("dataKey", "newValue");

You can see that the steps are a simple logical mapping of Backbone.js functionality to the MVC paradigm.

This works so well because of how Backbone.js defines Models and Views. Usually, there is a single Model for each View, and the two are built for easy monitoring. This assumes that the definition of the Model being used is (in terms of Object Oriented design goals) concise and simple, with only data that logically fits what the Model represents being contained within it.

The problem

Our application on the other hand, uses the architecture without Instance models. The Host model was built to contain information that doesn’t directly relate to what it is modelling, in the form of data about instances running on that host.

The relationship is a logical one (the actual hosts are hosting the instances their models contain information about), but if we are forced to treat the Host objects like they are also Instance objects, we add complexity when trying to relate other Backbone.js components to them. This complexity starts with the Host model object requiring a suite of methods to enable CRUD operations for the instances contained in the model.

A small pseudocoded example:

var Host = Backbone.Model.extend({
  initialize: function() {
    // Call custom method of the Host 
    // Object to populate this model
    // with Instance data 
    this.syncInstances();
  },

  ...  
 
  syncInstances: function() {
    // Pseudocall, intended to return an array of 
    // JSON objects representing instances
    var instances = API.callServer("instanceInfoRoute", this.get("ip"));

    // Iterates through the array, 
    // assigning each instance name to
    // a key in the Host model, with 
    // the data about that instance as 
    // its value.
    _.each(instances, function(element) {
      // this.set(attributeKey, attributeData)
      this.set("vm-" + element.name, element.data); 
    }); 
  }
});

Also, Read and Update operations require more resources! In a proper Instance model, data members could be easily and efficiently updated:

var i = new Instance({hostIp: 10.0.0.0});

i.get("status"); // "running"
i.set("status", "shutdown"); // Updates VM status
i.get("status"); // "shutdown"

but with our current architecture, since the instance-data exists as a key of its associated Host object, every piece of data about an instance will be retrieved, copied and returned when the get method is used:

var i = new Host({ip: 10.0.0.0});

// First, copy to a local variable
var instance = i.get("vm-InstanceName") // Returns: {status: "running", id: "1"}

// Then, update required attributes
instance.status = "shutdown";

// Finally, copy entire object back into the model
i.set("vm-InstanceName", instance);     // Copies: {status: "shutdown", id: "1"}

Further, this snippet didn’t touch on the logic needed to easily retrieve an Instance by name! Currently, a fixed prefix is prepended to the instance name, which then becomes the key for the instance data inside the Host model.

This is the only way to logically group the instances within the model, but requires yet MORE logic to remove or add the fixed prefix, depending on the action being taken. A more realistic pseudocode example would look like this:

var i = new Host({ip: 10.0.0.0});

// Function to get instance data when passed an
// instance name and a model
function getInstanceData (instanceName, model) {
  var key = "vm-" + instanceName;

  return model.get(key);
}

// Function to set instance data
function sendInstanceData (instanceName, model, data) {
  var key = "vm-" + instanceName;

  i.set(key, data);
}

// First, copy to a local variable
var instance = getInstanceData("instance-0000001", i); // Returns: {status: "running", id: "1"}

// Then, update required attributes
instance.status = "shutdown";

// Finally, copy entire object back into the model
sendInstanceData("instance-0000001", i, instance);    // Copies: {status: "shutdown", id: "1"}

With this all in mind, here is how we force a View to update itself without an Instance model object. It retains most of the simplicity of the first example that had two model types, but at the cost of overly complex and needlessly messy model logic:

var InstanceView = Backbone.View.extend({
  model: host,

  initialize: function() {

    ...

    // Instructs the view to re-render the view each time
    // a change event is fired on the model.
    this.listenTo(this.model, "change:" + this.options.instanceName, this.render); 
  },

  ...  
 
});

// Create an instance model object
var host = new HostModel(dataGoesHere);

// Create an InstanceView by passing the new
// model object
var exampleView = new InstanceView(host, {instanceName: name});

// Updates a value in the instance attribute
// of the host model, causing a "change:instanceName"
// event, updating the view
host.setInstance(instanceName, {data: newValue));

The Solution

We decided to refactor the code to use two models, now knowing that it would be much less work to co-ordinate the relationship between the models manually. Even without the assistance of Backbone.relational, or a similar framework for managing those relationships, the code ended up cleaner and more concise.

Enabling Jade highlight support on Sublime + Multi Column Selection

I wished Sublime came straight from the box with highlight support for Jade files, since it doesn’t, every time I change development machines or format my computer I find myself in the need of enabling Sublime to highlight Jade.
The process to do that is very simple, a one liner actually.

Mac

cd ~/Library/Application Support/Sublime Text 2/Packages && git clone https://github.com/miksago/jade-tmbundle.git Jade

Ubuntu

cd ~/.config/sublime-text-2/Packages && git clone https://github.com/miksago/jade-tmbundle.git Jade

A few things about Sublime:

  • Sublime is not OpenSource (I always thought the code was open)
  • The project is maintained by one guy.
  • It is very customizable.
  • It has a solid and growing community

I’ve been using Sublime for a while now, but I never actually went further to investigate the editor.

Today I decided to finally go and look at how Sublime can start highlighting a new file extension by simple cloning something to the Packages folder.

It turns out that all you need to do is create a XML file with all the patterns matching the language keywords that is being supported.
For example:

<?xml version="1.0" encoding="UTF-8"?>
<!DOCTYPE plist PUBLIC "-//Apple//DTD PLIST 1.0//EN" "http://www.apple.com/DTDs/PropertyList-1.0.dtd">
<plist version="1.0">
<dict>
<key>fileTypes</key>
<array>
<string>jade</string>
</array>
<key>keyEquivalent</key>
<string>^~J</string>
<key>name</key>
<string>Jade</string>
<key>patterns</key>
<array>
<dict>
<key>captures</key>
<dict>
<key>1</key>
<dict>
<key>name</key>
<string>keyword.control.import.include.jade</string>
</dict>
</dict>
<key>match</key>
<string>^\s*\b(include)\b</string>
</dict>
<dict>
<key>match</key>
<string>^(!!!)(\s*[a-zA-Z0-9-_]+)?</string>
<key>name</key>
<string>keyword.other.doctype.jade</string>
</dict>
....

You can see the full source here

After finding that I got even more curious and started to look around in the Sublime website for any information about how to create Packages.
There is a nice summary explaining the process and giving some examples.

I also found this tutorial guiding step by step how to create a Package.

But what really surprised me was to find the huge number of available Sublime Packages
You can see the list here
It has a plugin for everything you can think of, no joke.

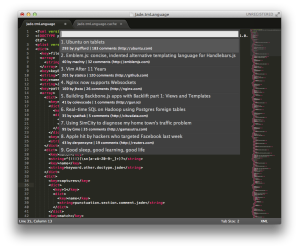
One that I thought was cool was the HackerNews plugin

And by simple cloning the repo to my Package dir it works, just like that:
Screen Shot 2013-02-19 at 3.44.20 PM

Selecting Multiple Columns

The official Sublime website has a pretty nice list of the shortcuts to select multiple columns on different platforms

Mac: Option + Left Mouse click

Linux: Shift + Right Mouse click

Creating API Documentation for Virt Manager

The past few weeks have been nothing but great. The work Kieran and I have been doing has finally start to take some good form and we are coming close to have a beta version release.

We had some bumps across the road but something that really stood out for me was the architectural design of the API.
Most of the times I find myself on the other side of the API, consuming instead of creating.
In this project though, we are having to create the API from scratch.

That’s a very good opportunity to put in practice experience of using other APIs through out the years. More than once I have caught myself complaining that an API is missing this  or that it should have implemented that, etc.
Now I can actually decide what should be included on the API and how the API should behave, which makes me think about all the bad experiences I had with other APIs and make sure I don’t make the same mistakes others did.

With that being said, Kieran and I found ourselves in more than one occasion having to go back and revise some decisions we had made towards the API. Sometimes related to the wording, functionality, response structure, etc.
Spotting errors and fixing them is good, however we also needed to document what the changes were so we could all be on the same page when it came to the latest state of the API. To make sure we could always tell what was the latest features supported by the API without having to go and browser through the source code we decided to create a reference page containing all the API calls and their respective responses.

At first we created the reference page in the README file of the github project, which worked for a bit, but it proved hard to navigate and display the data in a user friendly way, plus we knew that in the future we would need to come up with a better alternative, and that takes me to my next point.

Searching for the right tool

After looking at how other projects were doing in respect to their documentation we started to lay down a plan.

I remembered reading a blog post  a while back listing how the documentation for Popcorn.js was created. The post was from David Seifried, you can check it out here.

Basically the documentation for Popcorn is powered by Jekyll:

Jekyll is a simple, blog aware, static site generator. It takes a template directory (representing the raw form of a website), runs it through Textile or Markdown and Liquid converters, and spits out a complete, static website suitable for serving with Apache or your favorite web server. This is also the engine behind GitHub Pages, which you can use to host your project’s page or blog right here from GitHub.

Jekyll seems like a really good choice since it is already supported by github pages and allow a way to decouple the documentation from the actual project, creating some flexibility when it comes to hosting.

After playing a bit with Jekyll I realized that it could be used for our project, however, I needed to find out a way to display the docs in an organized way and with a nice template, that set me on a different journey looking into several project documentation websites.

The one that really caught my attention was the expressjs.com
The API is listed on a simple and clean way, really easy to navigate.
I decided then to use the same style for the Virt Manage docs.

Having spoken with TJ (the maintainer of express) a couple of times I shoot him an email asking if it was cool to use his template as a baseline, he couldn’t have been nicer and said it was all good.

I then cloned the repo for the expressjs.com on github and started hacking around.

I must say that at first it was a little bit confusing to follow the logic being used to generate the docs, but after changing some things here and there I got a good grip on it.
The structure for the docs is very simple and elegant, focusing on scalability and l8n.

I’ll try to give a short overview of how the docs are structured, which might change in the near future:

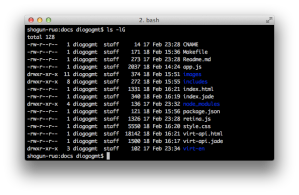
Docs root

virt-node-docs-root-ls

The structure is very straight forward.
All the html, javascript and css files are placed in the root.
The directories are:

  • images – All the images used by the docs
  • includes – Code snippets reused across multiple files
  • virt-en – Documentation of all API pieces in English

It is important to note that after defining the skeleton of the docs the only files that need to be changed are the ones in the virt-en directory, which for now are only being listed in English, however, if in the future we decide to add other languages we can easily create another dir, such as virt-fr which can contain all the API documentation in french, without affecting the overall structure of the docs.

Another thing you might also notice is that some files have the .html as well the .jade extension.
The reason for it is that the files are coded using jade, and the Makefile generates the html files which are served to the end user.

Makefile:


JADE = ./node_modules/.bin/jade

HTML = index.html \
	virt-api.html

docs: $(HTML)

%.html: %.jade
	$(JADE) --path $< < $< > $@

clean:
	rm -f *.html

.PHONY: docs clean

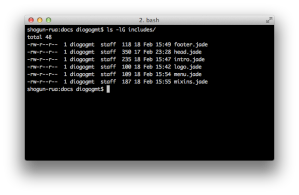
Include dir

virt-node-docs-root-includes

The include directory has some files reused across the docs, such as header, menu and footer for example

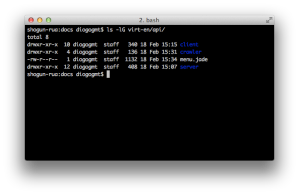
API dir

virt-node-docs-api

The API dir is divided into three sections:

  • Server
  • Client
  • Crawler

Each directory contains the documentation for all the API calls for each part of the application

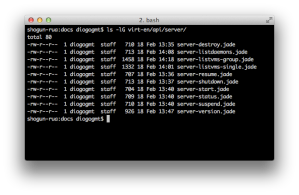
API Server|Client|Crawler dir

virt-node-docs-api-server-ls

The server dir for example has a file for each API call

The file server-listvms-group.jade:

section
  h2(id='server.listvms-group')
    |GET /list/vms

  p
    |Returns a list with the information of all instances being managed by all libvirt hosts

  h3 Format
  ul
    li
      |JSON

  h3 Authentication Required
  ul
    li
      |YES

  h3 Response Elements
  ul
    li err
      ul
        li Can have three different values
          ol
            li The error message of the command execution
            li The stderr output of virsh
            li Null if the command is sucessful
    li instances (Array of objects)
      ul
        li id
          ul
            li Unique Identifier of the virtual machine instance
        li name
          ul
            li The name of the virtual machine instance, which is also a uniquely identifier
        li status
          ul
            li The current status of the instance, possible options:
              ul
                li Status 1
                li Status 2
                li Status ...
        li ip
          ul
            li Ip of the libvirt host that is managing the virtual machine instance

  +js.
    {
      err: "Error message example"
      instances: [
        {
          id: "Instance ID",
          name: "Instance Name",
          status: "Instance Status",
          ip: "10.0.0.0"
        },

        {
          id: "Instance ID",
          name: "Instance Name",
          status: "Instance Status",
          ip: "10.0.0.0"
        },
        ...
      ]
    }

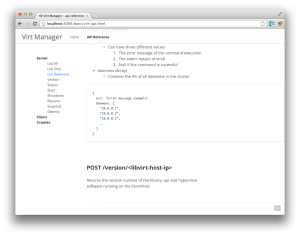
In the end that’s what the current API reference page looks like:
Screen Shot 2013-02-18 at 11.29.36 PM

To see the documentation in action you can check out the code on github

Big thanks again to TJ Holowaychuk
You can find his work here and the expressjs documentation here

VirshNodeManager Web App Development with Backbone.js

This has been the week of javascript for me, and it came together in my first few attempts to create an MVC client-side application using the Backbone.js library.

Defining the Models

I wrote a post about the MVC architecture, and if you aren’t familiar with the concepts on a basic level, go read it. I’ll be right here! Assuming you’re up to speed, my task was trying to decide how to represent the data our app needs to work with in models.

Our application uses data about two things, broadly speaking:

  1. Machines hosting libvirt
  2. The VMs being managed by each libvirt host

In light of this, my first thought was to create a model for each:

var Host = Backbone.Model.extend({
  ...
});

// &&

var Instance = Backbone.Model.extend({
  ...
});

Then all I would have to do is create a collection (like an array) of Instance models, and associate it with the Host model that represents the physical machine managing the actual VMs the collection represents. But how to associate the two? It would be clearly beneficial for there to be a programmatic relationship between each collection of Instance models and the appropriate Host model, but my options were limited by Backbone.js itself.

Backbone.js does not natively support relationships between models and models (like Instance and Host) or models and collections of a different model type (like a Host model and collection of Instance models). I did find a library to support this (backbone.relational), but we have deadlines to hit and I couldn’t afford to spend another half a day learning yet another library.

I pseudocoded the Instance and Host models to duplicate the information that binds them conceptually – the IP of the host machine. As you read it, keep in mind that the extend() method of Backbone.Model accepts a JSON object (a series of key/value pairs) to set features of the model being created:

var Host = Backbone.Model.extend({
  initialize: function () {
    if (!this.ip) { this.ip = 0; } // Safe state
  }
});

// &&

var Instance = Backbone.Model.extend({
  initialize: function () {
    if (!this.hostIp) { this.hostIp = 0; } // Safe state
  }
});

But, on thinking about it, I saw that to take this approach would effectively neuter Backbone.js – isn’t the point of a framework to keep me from having to manually manage relationships like this?

So I pseudocoded another possibility, where each Host model object contains a key for each VM on the machine it represents:

var Host = Backbone.Model.extend({
  initialize: function () {
    if (!this.ip) { this.ip = 0; } // Safe state

    (this.getInstances = function() {
      // AJAX API call to our interface-server to return VM data for the provided ip
      var result = $.ajax("/list/vms/this.ip", ... ); 

      // A fictional method that would parse VM data from the AJAX call
      // and create keys within the model for each VM detailed
      this.setInstanceData(result); 
    };) () // Immediate invocation after creating the method 
  }
});

This option appeared to be the lesser of the two evils. Strictly speaking, it would also break Backbone.js’s usefulness by ignoring an obvious candidate for a model (Virtual Machines), but also would prevent the user from having to keep track of which Instance collection was paired with which Host model without the relevant library.

In the end, we decided that I was right to forgo learning another library, and that my second approach would be the most reusable.

Host Model Implementation

Backbone.js provides a constructor for each model, where the user can pass key/value pairs and they will be assigned to the new model object as it is invoked. Then, after the constructor logic completes, Backbone.js looks to see if an “initialize” key was defined (like in my examples above) and runs that logic.

For the Host model, the initialize method needed to do three things:

  1. Ensure an IP was passed, and set a safe state if not
  2. Pull vital information about the host machine (cpu/memory usage etc.), assigning them as keys
  3. Pull information on all instances being managed by Libvirt on that host, and then assign them as keys for the model representing that host

AJAX & jQuery

At this point, setting a safe-state IP address was a cakewalk – as it should be. The other two required me to learn how to use jQuery’s AJAX method.

The jQuery library is a dependency for Backbone.js, and is available as a global object throughout an app using Backbone.js. To leverage this, I read the documentation for the AJAX method, and created the following pseudostructure for my AJAX calls:

$.ajax({
  url: "apiCallGoesHere",
  datatype: "json", // Defines the return datatype expected
  cache: false,     // Just in case
  success: function() { successCaseLogicGoesHere },
  error: function(textStatus) { 
    switch (textStatus) { // "textStatus" is the error code passed to this function
      case "null":
      case "timeout":
      case "error":
      case "abort":
      case "parseerror":
      default:
        // Error logic will populate these cases
        console.log("XX On: " + this.url + " XX");
        console.log("XX Error, connection to interface-server refused XX");
        break;
     } // END SWITCH
  } // END ERROR LOGIC
}); // END AJAX CALL

By bumbling around with my now intermediate understanding of JavaScript, I threw together a test version of the model, and ran into a few challenges:

The context of “this”

In JavaScript, nested functions lose access to the this attribute of their parent. This is a noted design flaw in the language, and made my code do some funny things until I tracked it down as the root of the problem. The solution was to define a that variable that contained a reference to the parent function, e.g.

var that = this;

…which would be accessible to all subfunctions as an alias for the original context of this.

Get/Set methods

Backbone.js model objects aren’t just key/values that the user defines – they inherit from the Backbone.Model object, which contains the constructor logic and more. Trying to define and retrieve attributes directly failed badly because the user-defined keys were actually stored as a JSON object under a key called attributes:

var host1 = new Host("0.0.0.0"); // Create new model

host1.ip = "2.3.4.5"; // works, but creates a new key because...

alert( host1.attributes.ip ); // 0.0.0.0
alert( host1.ip ); // 2.3.4.5

In order to take advantage of Backbone.js’s ability to use user-defined validation, the user has to use the provided set/get methods for the most secure, cohesive implementation of a Backbone.js powered app:

var host1 = new Host("0.0.0.0"); // Create new model

host1.set("ip", "2.3.4.5"); // BINGO
alert( host1.get("ip") ); // 2.3.4.5

The other benefit of using the get/set methods is that using them fires a “change” event, which can be used to trigger actions (like a re-rendering of the webpage to show the new information).

Redundant code

I repeated the same basic AJAX call structure at least four times before I decided to factor it out into a helper object called API. This way, each component of Backbone.js could use a standard method of making a call without duplicate code:

var API = {
  // AJAX wrapper
  callServer:  function(call, success, error) {
    $.ajax({
      url: "/" + call,
      datatype: "json",
      cache: false,
      success: success,
      error: function(textStatus) {
        // INTERFACE-SERVER ERROR HANDLING
        switch (textStatus) {
          case "null":
          case "timeout":
          case "error":
          case "abort":
          case "parsererror":
          default:
            console.log("XX On: " + this.url + " XX");
            console.log("XX Error, connection to interface-server refused XX");
            error();  
            break;
        } // END-Switch
      } // END-Error
    }); // End ajax call
  }, // END callServer function
} // END API object

Now it was as easy as:

API.serverCall("apiCallPath", function() { successCallbackLogic }, function() { errorCallbackLogic});

Defining a collection

The next challenge was to define a collection for Host model objects. To over-simplify it, a collection object is an array of a specified type of model object, along with methods for manipulating that array. In this case, we needed it to make an API call to find all the IPs of hosts running Libvirt, and then create a Host model for each one.

The logic was very simple, since collection objects support the initialize key in a similar fashion to the model objects.

Making it run

By strategically adding console.log() calls, we were able to watch the app run – headfirst into a wall. Diogo wrote a post about that particular issue, and as we resolved it, we reflected on how inelegantly our Backbone.js app handled the error.

In response, we standardized the format of our API into a JSON object with the following attributes:

{
  err: "errorCode",
  data: {
    dataKey: value,
    ... : ...,
    ...
  }
}

…which simplified the implementation of error handling within our application.

Our next try still didn’t work, but showed us how beautifully the error-handling resolved.

Our console log:

[creating hosts] VNMapp.js:200
-begin collection calls VNMapp.js:182
Failed to load resource: the server responded with a status of 404 (Not Found) http://192.168.100.2/list/daemons/?_=1360940232244
XX On: /list/daemons/?_=1360940232244 XX VNMapp.js:23
XX Error, connection to interface-server refused XX VNMapp.js:24
XX Cannot find daemon-hosts! XX 

Our next next try was our last – we had proof the app was working.

Our console log:

[creating hosts] VNMapp.js:210
-begin collection calls VNMapp.js:193
--Add Model | ip: 10.0.0.4 VNMapp.js:199
New Host!
IP:10.0.0.4 VNMapp.js:189

Next Steps

Next is developing a View object for each part of the app’s UI that will be dynamically updated, and splitting the static parts of the page into templates to make duplication and updating easier.

This will be covered in a further post, but so far we are happy with our work finally coming together!